
If you are not comfortable with the way that Alexa records your voice commands, you can delete Alexa recordings if you are so inclined to do so. Before you start removing, keep in mind that you are actually removing the specialized memory of AI, as it retains this data to serve you better. Well, there’s still the way to clear Alexa recordings and history. There are two different ways to delete Alexa history.
Clear History Entries Individually
If you want to clear individual entries in your Alexa history, not the entire one, here are the easy steps to do so.
- Open Alexa App – Open the official Alexa mobile app on your Android or iOS device and log in to your Amazon account. For your information, it is actually a light-blue app with white outline having a speech bubble. Be sure to log in to the same Amazon account that your Alexa device is registered with.
- Now tap 3-lined icon – On the top left corner, you will find the three-lined icon on the screen. Tap on it and you will see a pop-out menu on the left of the screen.
- Tap Settings – You can find this option on the second last at the bottom of pop up menu.
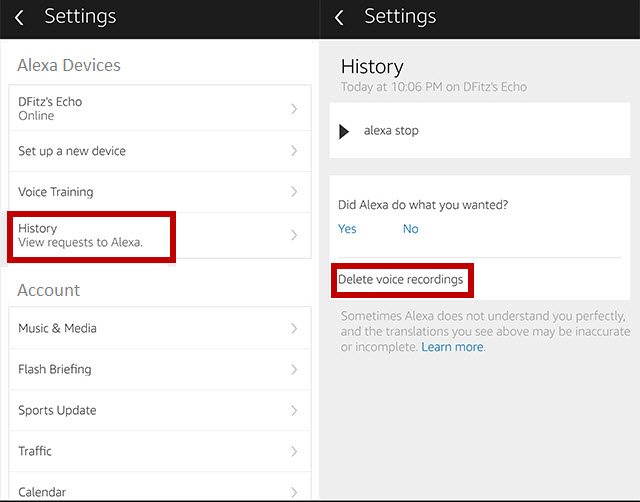
- Tap history by scrolling down – It is positioned around the bottom of Settings under General heading.
- Now you need to select the entry you want to remove – Scroll around the entries to check the complete list of commands that have been used with Alexa. To remove the entry and to check more information, tap on it.
- Select “Delete Voice Recordings” – It is basically a gray button positioned at the bottom of the page. It removes Alexa entry and voice recording from the history. You can even playback audio recording of a particular command and then clear it.
Delete Complete Alexa History
- Go to web browser and open https://www.amazon.com – Go to the official website of Amazon in any web browser you have been using on your PC.
- Log in with the Amazon account that your Alexa device has been registered with.
- Now click “Account & Lists” option – On the right side of search bar, this option is located on the top of page. Click on it to go to account page.
- Now go to “Content and Devices” – In the “Digital Content & Devices” heading, you will find this option on third row.
- In the middle of the page, now click “Your Devices” tab.
- Now click next to your Alexa device. Your Alexa device must be listed as “Echo Dot” which might be its default name, unless you rename your device. It will open a panel to launch pop up with more options and details.
- If you have listed a lot of devices, you can look for it by typing the same in search box at the top right corner of page.
- Now go to the pop-out panel and click “Manage your Voice Recordings” at the bottom.
- Now click the option “Delete”. It is actually a yellow button in the right side of popup window at the bottom.
- Keep in mind that deleting your recordings completely may affect Alexa’s efficiency and accuracy to recognize your voice commands.
- Deletion process takes some time. So, you can still see your Alexa history in Alexa app for a while.


Reply