A Canadian-based Ecobee has introduced a smart thermostat on 2009. The company has recently released the $249 Ecobee3, an attractive Wi-Fi thermostat that you can control from your iOS or Android phone and from your PC via the Web. The thermostat is simple to install and even easier to program, and it’s loaded with characteristics including a remote sensor for heating and cooling rooms outside of the thermostat zone, various reminders and alerts, a capacitive touch display, and a Home IQ system monitor that tracks heating and cooling usage. It’s our new Editors’ Choice for smart thermostats.
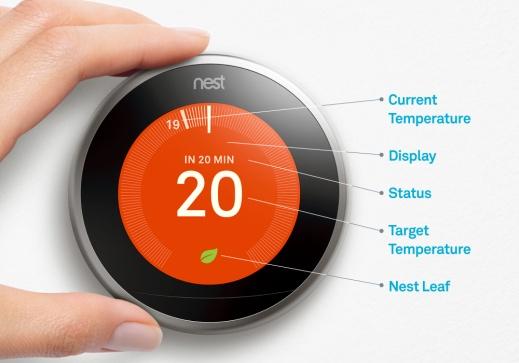
The Ecobee3 thermostat has a stylish 3.9-inch square housing with rounded corners that is under an inch (0.90-inch) thick. Behind the Ecobee3’s black faceplate is a 3.5-inch full-colour capacitive touch display, and behind that is a white wall plate with 11 terminal connections for heating, cooling, heat pumps, air handlers, and accessories. The Ecobee3 is compatible with most 1- and 2-stage HVAC systems and can control compatible dehumidifier, humidifier, and ventilation devices. In the middle of the display is the current temperature, and to the right is a vertical slider for manually setting the temperature. I found the slider to be a bit too sensitive, forcing me to slow down my finger swiping to land on the desired degree mark. Other than that, the screen is very responsive and easy to navigate. A snowflake icon appears above the temperature readout when the system is in cooling mode, and a flame icon appears when it’s in heating mode. Below the temperature, readout is icons for the Main Menu, Live Weather, and Quick Changes. Live Weather shows the current local weather conditions with temperatures and icons for snow, rain, clouds, or sun. It also displays the extended weekly forecast.
The Main Menu is where you go to enable and disable your HVAC system and set fan runtimes. Here you can also set Comfort settings for when you’re home, away, or asleep, and create daily and weekly schedules using these settings. You can also set a vacation schedule based on your departure and arrival dates and times, and set a temperature for that timeframe. The Ecobee3 offers a nice selection of alerts and reminders for things like maintenance, filter replacement, UV lamp replacement, low and high temperature, and low and high humidity. You can have notifications pushed to your smartphone and sent to an email address
Installation and Performance
Installing and configuring the Ecobee3 is fairly easy. It does require a C (common) wire, which supplies power to the thermostat, but if your system doesn’t have one, don’t despair: The Ecobee3 comes with a Power Extender Kit that supplies power to the thermostat. The power kit is not difficult to install, and Ecobee provides explicit instructions. It does require tinkering with your furnace wiring, so if you’re not comfortable with that, you might want to bring in a professional. After powering down my HVAC system I removed my old thermostat, labelled the wires, hooked up the Ecobee3, and attached it to the wall (I have a C wire and did not have to install the power kit). Upon powering up the system, the Ecobee3’s display showed a wiring diagram and asked me to verify if it was correct. It then asked if I had any dehumidifier, humidifier, or ventilator devices installed, and asked me to choose Fahrenheit or Celsius and to verify my heating system type. Next, I was prompted to enter my ideal home temperature, and I enabled the Smart Home/Away feature. Now it was time to connect to my Wi-Fi; I chose my SSID, entered my password, and was connected within 15 seconds. At this point, a registration code was generated. I went to the Ecobee site to register the thermostat and was asked to enter my 4-digit registration code, my name, email address, and password. I was then asked if I wanted to set up my weather, which involves accessing my location and supplying an address, and if I wanted to enable the Home IQ feature. I answered yes to both and that was it. The entire installation process took less than 30 minutes.
Enabling the sensor was simply a matter of standing in front of the thermostat and pulling out the battery tab. The sensor was identified and paired with the Ecobee3 in just a few seconds. I named it and placed it in my office, which is on the other side of the house from the thermostat and is usually a few degrees cooler than the rest of the house.
The Ecobee3 worked like a charm. It responded immediately to manual changes made directly on the screen and showed only a very slight lag when responding to changes made via Wi-Fi on my iPad. The thermostat followed my Home, Away, and Sleep schedules perfectly, and reacted to Quick Changes instantly. It also sent push notifications and email alerts when the temperature and humidity reached my specified thresholds, and the sensor kept my office nice and toasty.
Reply